Showing posts with label iPhoto. Show all posts

Monday, February 8, 2010

Burning your iPhoto slideshow to a DVD using iDVD

Ok...So in the last post we talked about how to make your iPhoto slideshow. Now it's time to save it on a DVD that your family can watch on their TV's at home. We are going to use another Mac program called iDVD.
Let me make a note, that there are a lot of ways to customize your dvd and there are different ways to do the steps that I'm about to show you, but for the sake of simplicity, I'm going to just show you one way to do it and leave out all the other options. If you play around in iDVD, you'll find lots of neat stuff, and if you ever make a mistake hit CMD-z to undo or the delete key, and you'll see a cool puff of smoke when you get rid of your mistake! Ok! So on to step...

1) Open iDVD. When you open it, your last project will automatically show up. So go to the top of your screen and choose File - New, and you will get this dialog box....
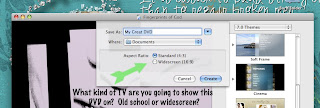

Choose a name for your project, and where you would ultimately like it to be saved (your documents folder is the default). And you need to choose what TV screen format you want it to be created for. If you are going to be viewing this on a newer computer or a flat screen TV, pick widescreen; if it's an "old school" TV (or if you're not sure) choose standard. Then click Create!

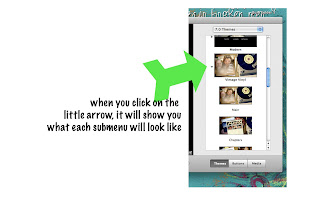
2) On the right hand side of your window, there's a column called "Themes." iDVD has pre-set themes that will give your dvd a cohesive look. There are lots of options from super cutesy, to vintage, to modern artistic, to kinda neutral.... Pick the one you like. I chose "Vintage Vinyl." You'll see things called "drop zones" - don't freak out, we'll make those look better in a minute. Unless you are building a movie with lots of little chapters, you don't really need to worry about what the submenus look like, because this DVD won't have any.

3) Now dealing with the drop zones. On my "Vintage Vinyl" theme, there's one main drop zone - a place to put a picture to personalize the look of your main menu. There are a couple ways to add a photo or movie to your drop zone, but I'll just tell you the way I normally do it. At the bottom of that right hand column, there are 3 buttons, and one says media. Click it. That column will change and will show either all the photos, all the movies, or all the music it can find on your computer. Click on the tab for photos (at the top of the column), choose a photo, and drag it over to the drop zone, and drop it. If you don't like the way it looks, press delete on your keyboard and it will disappear in a poof of smoke. Try it! It's funny! If you'd rather have moving pictures in your drop zone, you can drag a movie over to your drop zone. If you click audio, and drag your favorite song over to the drop zone, it will replace the default song on the menu.
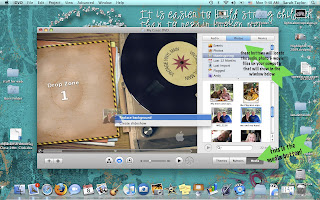

4) Ok, now your menu is set. Let's bring in that slideshow we worked so hard on in iPhoto. Click FILE-Import-Video, and it will look like this....
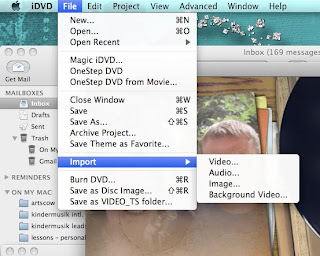
And it will bring up this dialog box.....
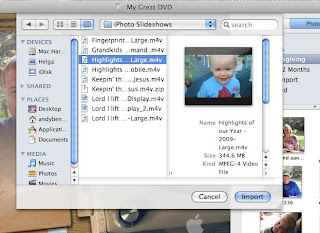

Find where you saved your slideshow, and click Import. (If you've forgotten where you saved your slideshow - type the name of the show in the little search box in the top right corner.)

5) The name of your show will show up next to a little bullet on your main menu! You can change the text, font, size and typeface by clicking on it once, and typing or choosing the corrections.
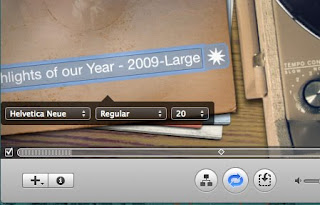

6) If you have more than one slideshow or movie you want to put on the DVD, repeat steps 4 and 5. Depending on what you import, you may have to make a sub menu, but it's just like making your main menu. If you click the little button at the bottom center of your screen that looks like 1 box on top of 2 boxes, it will show you the "flow chart" of your DVD and whether or not you have submenus to make. There's a button toward the bottom center of the "flow chart" page that says "return," and it will get you back to your main menu.

7) Preview!!! Once you think you have your DVD entirely built, preview it!! You'll see it the way anyone who receives your DVD will see it. It's another good way to check for mistakes.
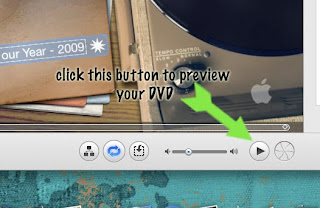

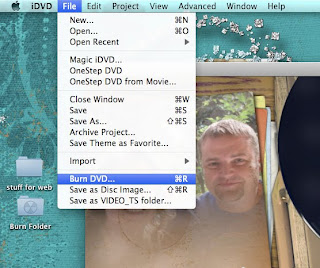
8) Once you are satisfied with every last detail, it's time to Burn Baby Burn! Click FILE-Burn DVD.

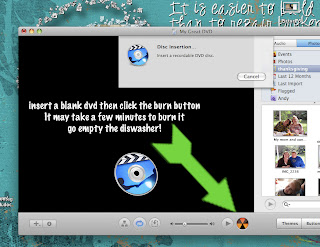
Put in a blank dvd in your dvd burner, and click the button that's black and yellow, and you're burning! Once you burn one, it will ask you if you want to burn more.

And that's it!!!! You're DVD is done! You can throw it in your dvd or give it to a friend and enjoy. Later I'll show you a nifty little envelope thingy I made out of a piece of cardstock and some scrapbook paper scraps to hold my DVDs with. You'll love it! Thanks for looking.

Saturday, February 6, 2010

Making a "Year in Review" slideshow/dvd in iPhoto

I wanted to share with you one of the most popular Christmas presents that I made this year - a "Year in Review" DVD. I had all intentions of making a bragbook using my digital scrapbooking stuff with our favorite pictures of the year to give to the grandparents, aunts and uncles this year. Well, I ran short - of time and budget - to get it done! I also had a few prints made for each family member. I decided to use iPhoto to put together a photo slideshow of some of our favorite pictures of the year, along with some of our favorite songs. It was great because I had all the photos, the software, and blank DVDs to burn them on. This present literally cost me nothing (except a few hours of work to make 8 presents!) Here's how I did it....
1) Open iPhoto
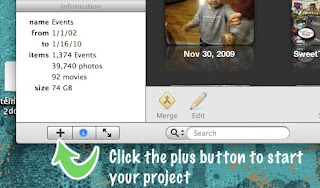
2) Click the plus sign in the lower left corner to start your project

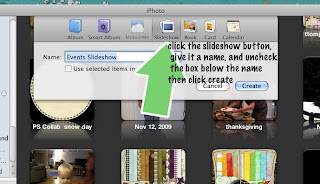
3) A menu will pop up. Click "slideshow". Name the project. I uncheck the box under the name (unless I have already selected some of the pictures that i want in my slideshow - then I leave it checked). Then click "Create"

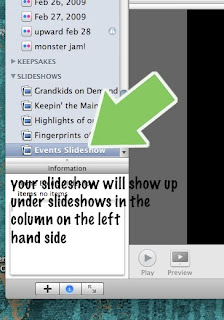
4) At this point your slideshow project will be in the left hand column under slideshows. You've gotta know where this is for the next step. It won't be called "events slideshow" - it will be called whatever you named it. If it's highlighted (like it is in my screenshot), you'll have a big black box in the main window...don't freak out!


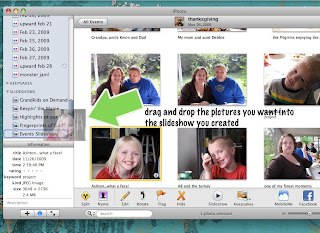
5) Click on Events in the left hand column and find the photos for your project. Now drag and drop the photos you want from the events you've opened in the main window onto the name of your slideshow in the left hand column (remember from step 4?) You can drag individual photos, multiple photos (by holding down the CMD key on the keyboard and clicking on photos) or an entire event.

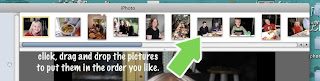
6) When you double click on the name of your slideshow, you'll see all the photo thumbnails across the top of the page. Drag and drop the photo thumbnails across the top of your slideshow to put the photos in the order that works for you.


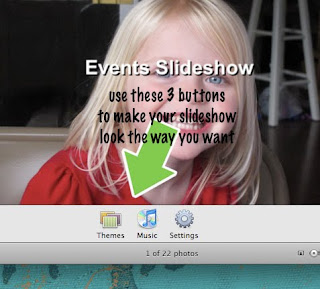
7) Click on the "themes," "music," and "settings" buttons to make your show look the way you want it to. You may have to click an "apply" button to make the changes stick. iPhoto automatically saves your settings, so that even if you quit iPhoto, your slideshow settings will be saved the next time you open iPhoto.


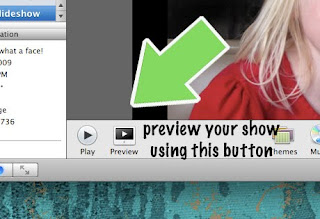
8) Click the preview button to see what your slideshow looks like in the main iPhoto window. Clicking the play button makes it show up fullscreen. Pressing the "esc" button on your keyboard stops the playback.


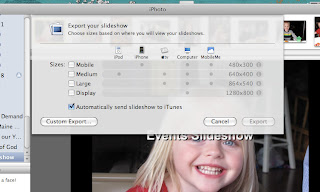
9) Once you have your slideshow just the way you want it, you can keep it right where you have it, and just show it in iPhoto from your computer. Or you can share it by exporting it. Click the "export" button, and this dialog box will pop up....


You need to choose what size you want to save it on your hard drive. You need to think about what you want to do with it next. I knew I was going to burn it on a DVD to show on a TV so I did display (large would have worked too), but if you're only going to put it on youtube or your iPod, you can choose something smaller. Choose your size, click export, choose where you want to save it on your computer and what you want to name it, and you're done! The exporting process does take a few minutes as iPhoto renders the still pictures into a movie format...again...don't freak out. The more photos, the longer this will take. You should be able to watch your photos move along as it renders. Most of the time, I try to load or unload the dishwasher before the exporting is done. :o)

In my next post, I'll go thru how to take your slide show off your computer and onto a DVD to give as a gift!

Here's my finished slideshow. Let me know what you think!

Wednesday, October 21, 2009

Organizing Digital Scrapbooking Supplies with iPhoto

One question I see a lot on scrapbooking blogs is "How do you keep organized?" It is a dilemma - how can you organize your digital scrapping stash so that you can find what you want when you need it? Do you keep your kits together? Do you organize by designer? By color? By theme? Do you break every kit apart, and keep all the papers together in one file and all the ribbons in another and the buttons in a third? What about things that fit into more than one category?

I've found a way where I can organize my scrapping stash in a variety of different ways, so that I can find what I'm looking for by designer, by kit or by element. If you are lucky enough to have a Mac computer and iPhoto program, then you can too.

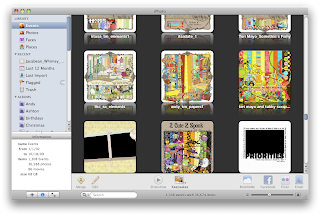
1. When I download a new scrap kit, it ends up in my downloads folder in my Finder. I drag all my newly downloaded folders onto the iPhoto icon at the bottom of my computer and import them into iPhoto. Each folder is a new event.

2. Most of the time when you buy a kit, it comes in a few folders - a paper folder, an elements folder, and an alpha folder. Each folder will be its own even in iPhoto, but I will merge all 3 events into one for the sake of streamlining. I shift click on 2 of the events and drag them onto the third event, and choose yes when it asks if I really want to merge all 3 events. Then when you click on the event, all the paper, elements and alphas for a specific kit will be in the same event.

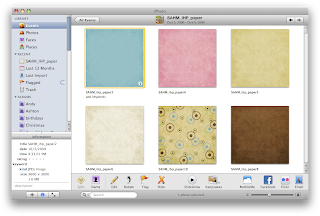
3. I also re-name the event with the designers name and the name of the kit. I double click on the event and usually the designer includes a preview, and I make the preview the key photo for the event. The key photo is the one that shows up on the event page. You can make a photo the key photo by right clicking on the photo that you want and choosing 'make key photo.' I organize my events alphabetically by designers name, because that's how I normally remember what kit I want to use. in the photo above, you can see several of the kits that I have from Teri Mayo. If I remember the name of the kit, but not the designer, I'll use the search bar at the bottom of iPhoto and type in what I remember, and it usually pulls it up.


4. Once I've imported and re-named my kit, then I'll add keywords to each piece of the scrapbooking kit. I created custom keyword tags for my stash. Every paper gets tagged with the "paper" keyword; every ribbon gets tagged with the "ribbon" keyword. Here's how to create custom keywords. First, press command + K at the same time, and your keyword menu will pop up

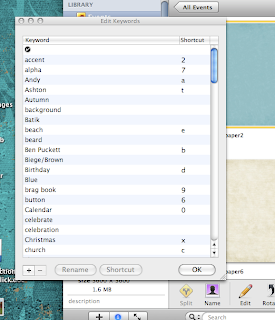
Then click the "edit keywords" button at the bottom to add your custom keywords.

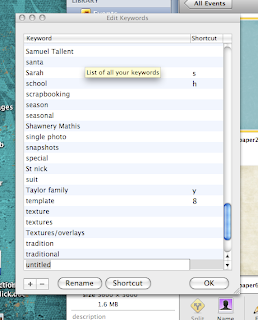
Click the plus sign at the bottom to add your new custom keyword.


Type in your keyword. Then choose a shortcut for your new keyword and click OK. A shortcut is the key you press on your keyboard to choose that keyword. I use the number 1 as my shortcut when I want to add the keyword "paper" to a digital scrapbook paper. 2 is for accents; 3 is for frames and borders; 4 is for ribbons; 5 is for journaling spots; 6 is for buttons; 7 is for alphas; 8 is for templates and quick pages; 9 is for brag book pages. I also have a letter designated for each person in my family, so that when I import photos that I've taken, I can tag each person in my family that's in each photo. That way when I'm looking for the perfect shot of my son, all I have to do is type his name in the search bar and all the photos that I've tagged of him will show up.

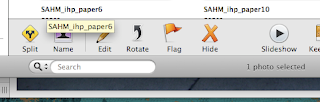
5. Once you have all your keywords set up, double click your new scrapping kit from your events, press command + K to open your keyword menu, click the first photo in your scrap kit, and start tagging. For the photo below, the first 3 photos in my scrap kit are paper, and I press 1 to tag it (because 1 is the shortcut for the paper keyword), then I'll press tab to go to the next photo. I can add keywords to a normal sized scrap kit in less than a minute.
That's the basic way I organize. I've also added something called smart albums to help me find things quickly. A smart album groups all the photos together that have certain properties. I have a smart album for all my scrapbook papers, for instance, and when I click on it, it will show me all the different papers i have.


To make a smart album, click File - new smart album


Name your smart album - I have ones for each of my scrapbooking keywords. And use the dropdown menus to define what goes in each smart album. I choose "keyword" from the first menu, "is" from the second, and then the keyword that I want included. Then click ok. For instance, in my "Scrapbooking Papers" smart album, I have all the photos whose keyword is "paper," and every time I add the keyword "paper" to a photo, it automatically updates in the smart album.


I hope that helps all you Mac scrapbookers who use iPhoto! If you have any questions, leave a comment!


Related Posts with Thumbnails

Swidget 1.0