Friday, February 8, 2013

On Curating Memories in Multiple Digital Places

I've been hearing lots of buzz recently on adding links and QR codes to scrapbook pages as a way to curate and combine the memories you may have in multiple places like YouTube, Facebook, Twitter, personal blogs, Pinterest, etc. I know I've thought about it. Sometimes I'm better at keeping our memories up to date and detailed on my social media sites than I am at making scrapbook pages. What can I say? Social media sites have made it so easy for us.

The Digi Show (a weekly podcast about digital scrapbooking that I listen to) talked about it in this episode, and it resonated with me. I want to share a full story on my scrapbook pages, but sometimes the story goes beyond what I can put on the page.  I thought about a history project my son did recently. He wanted to make a stop motion video about the Battle of Gettysburg using his army men. He and I did it together! I knew it would be easy to record my feelings and perspective on the project in journaling, but half of the story was the actual video that I posted on YouTube! How was I going to have that represented? Same memory - recorded in 2 places....

Here's what I did...

jan13_historyproject

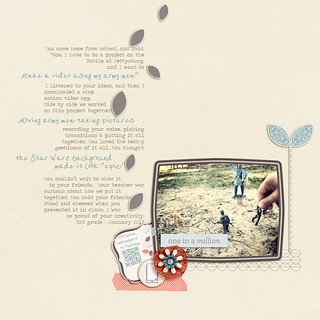
I wrote my story and I added a QR code linked to the YouTube video in the journaling box. (If you want to scan the QR code, the best way to do it is to look at the full size version in flickr. It should be big enough to scan there.)

Here's how I did it...
1) I downloaded a QR code generator to my iPhone. There are bunches of them, but I chose one that did not have to be connected to the internet for it to work, and it was free...so that's a plus.  When it generates the QR code, it is saved as a picture in my photo stream on my phone.

2) I transferred it to my computer. I used the flickr app to upload it, then downloaded it to my computer. But there are 100 ways to get a picture from your phone to a computer. Pick your fave.

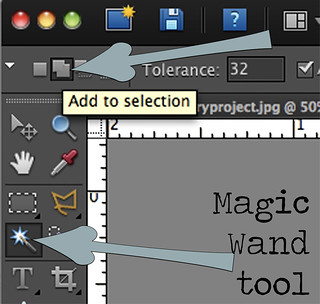
3) I altered it in PSE. I used the magic wand tool with it set on "add to selection" and I continued to click the little black squares until they all had the marching ants around them.

magicwand tool

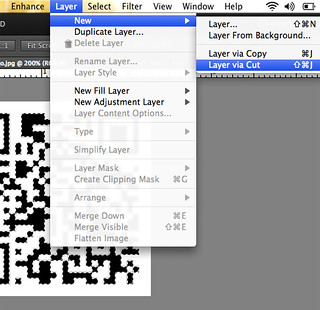
 I then chose Layer>New>Layer via cut. That puts all the black squares on their own layer.

layerviacut

I pulled the black squares layer onto its own canvas, and then I added a layer of solid light blue color above the dot layer, and then I clipped them together.  Check out this tutorial on clipping masks.
Then my ugly black and white QR code matched the cute kit that I wanted to use, and it's ready to go. (The kit is Retrospective by One Little Bird). I just put it on my page like any other element.

Here's some thoughts on using QR codes.
1) You need to make sure your code colors have enough contrast. A tone on tone QR code may look nice to you, but it will be hard for your scanner to read.
2) Make sure it's big enough. I'm actually afraid that when I go to print my page out the code will be too small to be read by my phone scanner. I usually print my pages out at 8x8. I definitely will make my code a little bigger next time.
3) Think about the longevity of your link. I've posted the video that goes with this layout in a few different places - YouTube, Facebook, Twitter - but I figured my YouTube account will be around the longest with the least amount of changes. Maybe I'm wrong....but that's what I went with. Think about connecting your layouts to sites you have the most control over - like a personal blog.
4) Think of it like a treasure hunt for the future. I know years ago, I would record myself and my students and children talking and singing on cassette tapes. I don't even own a cassette player now, but if I wanted to hear them, I could figure out how to do it. The same goes with old versions of film and video. There are services today that convert those film versions into DVD. I think its the same with QR readers. I don't think they're going anywhere, but if they do, someone will be converting them.

For me, this is the first of many layouts of this type that I'll be doing. The layout has merit and value on it's own because it records my thoughts about the experience. Adding the QR code that links to the video helps to tell the rest of the story.

Think of all the people who dig through newspaper archives, public records,  microfilm, and ancestry sites to find out about their personal history. This is like "leaving crumbs on the trail" for your loved ones in the future to find things about them on the ever-expanding internet. I know my kids, especially my son, will enjoy going on the journey to find all the links to his story.

Sunday, January 13, 2013

From Pinterest to Real Life - The Collage Wall

Pinterest...
I have a love/hate relationship with Pinterest.
I love/hate finding good things that waste my time because I'm already soooo good at wasting my own time. I also love/hate finding so many good things that I get overwhelmed thinking about the awesome potential of it all. And then I do...nothing.
See... that's why I love/hate Pinterest, and that's why I resisted joining up for so long. So I'm determined to only (mostly) pin things that I will actually (might actually in the future) do. And today I'm celebrating something I actually did! Yea ME!

THE COLLAGE WALL

I'm a photo addict. I love taking pictures and having pictures taken. I like displaying them, and fortunately in our new house we have HUGE walls and TONS of wall space. So I decided to do a collage wall.
Now note, I had done a collage wall in our old house, and I liked how it turned out, but I didn't love it. It never quite looked right. So I went to Pinterest and looked for some help in this area. I found this...


I found all of the pictures in the boxes that we had that had silver frames and collected them all together. There were 15. I traced them all out on an old roll of wrapping paper.

IMG_1906

I also labeled what picture I had traced, and I marked where the hangers were on the frame...you'll see why in a minute.

IMG_1907

And then I cut them all out. It was tedious, and I wondered if it was worth the hard work...but I pressed on. I initially arranged all of the paper cut outs on the floor. It was a little easier for me to move them around and play with them like puzzle pieces.

Collage wall project

Then I used my handy blue painters tape and bullet level and started taping them to the walls.

Collage wall project

I kept putting up my little squares on the wall until I had this

Collage wall project

Then I had my Main Squeeze come in and start drilling screws and hanging pictures. I totally could have done this myself, but he's so good at it, and it went very fast. It would have taken me 2 or 3 times as long.  Remember where I marked the hangers on the paper? He just put the screw in the wall through the paper, then ripped the paper off the wall. We did a little measuring and leveling at this point just to make sure it looked the way we wanted it to.

Collage wall project

When we finished, it looked like this....

Collage wall project

A couple lessons from this project...
*If you're a perfectionist, this project will drive you crazy. It's hard to take a 3D object like a frame and transfer it to a 2D piece of paper then cut it out perfectly and hang it level. If you look closely, my results are not perfect, but I think they're pretty great!
*Frames with table top stands are hard to hang on a flat wall. Your frame will not sit flat on the wall and will not look level. We destroyed several stands by ripping them off the back of the frame in this project. That was fun!
*Command strips by 3M are one of my favorite products. We had frames that just didn't want to hang right with the screws and hangers, so we'd cut a command strip and put it on the corner and it would help it stay.
*If you have old frames that aren't all the same color, use silver craft paint to make them all the same color. It saved me a ton of money.
*It does take a lot of time to trace, cut out, lay out and hang all the paper cut outs. But when it comes to the actual hanging, the time flies by. This day, my main squeeze and I had hung 29 pictures. Most of them by using this method. Once I got all the paper cut outs taped up, it took him an hour to hang the 29 pictures. Boosh.

Have you ever tried doing something like this? How did it turn out? Do you love or hate the process of hanging pictures?
Related Posts with Thumbnails

Swidget 1.0