One question I see a lot on scrapbooking blogs is "How do you keep organized?" It is a dilemma - how can you organize your digital scrapping stash so that you can find what you want when you need it? Do you keep your kits together? Do you organize by designer? By color? By theme? Do you break every kit apart, and keep all the papers together in one file and all the ribbons in another and the buttons in a third? What about things that fit into more than one category?
I've found a way where I can organize my scrapping stash in a variety of different ways, so that I can find what I'm looking for by designer, by kit or by element. If you are lucky enough to have a Mac computer and iPhoto program, then you can too.
1. When I download a new scrap kit, it ends up in my downloads folder in my Finder. I drag all my newly downloaded folders onto the iPhoto icon at the bottom of my computer and import them into iPhoto. Each folder is a new event.
2. Most of the time when you buy a kit, it comes in a few folders - a paper folder, an elements folder, and an alpha folder. Each folder will be its own even in iPhoto, but I will merge all 3 events into one for the sake of streamlining. I shift click on 2 of the events and drag them onto the third event, and choose yes when it asks if I really want to merge all 3 events. Then when you click on the event, all the paper, elements and alphas for a specific kit will be in the same event.
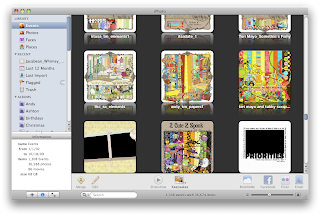
3. I also re-name the event with the designers name and the name of the kit. I double click on the event and usually the designer includes a preview, and I make the preview the key photo for the event. The key photo is the one that shows up on the event page. You can make a photo the key photo by right clicking on the photo that you want and choosing 'make key photo.' I organize my events alphabetically by designers name, because that's how I normally remember what kit I want to use. in the photo above, you can see several of the kits that I have from Teri Mayo. If I remember the name of the kit, but not the designer, I'll use the search bar at the bottom of iPhoto and type in what I remember, and it usually pulls it up.

4. Once I've imported and re-named my kit, then I'll add keywords to each piece of the scrapbooking kit. I created custom keyword tags for my stash. Every paper gets tagged with the "paper" keyword; every ribbon gets tagged with the "ribbon" keyword. Here's how to create custom keywords. First, press command + K at the same time, and your keyword menu will pop up

Then click the "edit keywords" button at the bottom to add your custom keywords.

Click the plus sign at the bottom to add your new custom keyword.
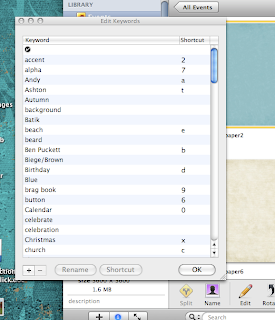
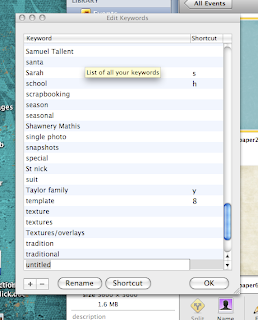

Type in your keyword. Then choose a shortcut for your new keyword and click OK. A shortcut is the key you press on your keyboard to choose that keyword. I use the number 1 as my shortcut when I want to add the keyword "paper" to a digital scrapbook paper. 2 is for accents; 3 is for frames and borders; 4 is for ribbons; 5 is for journaling spots; 6 is for buttons; 7 is for alphas; 8 is for templates and quick pages; 9 is for brag book pages. I also have a letter designated for each person in my family, so that when I import photos that I've taken, I can tag each person in my family that's in each photo. That way when I'm looking for the perfect shot of my son, all I have to do is type his name in the search bar and all the photos that I've tagged of him will show up.
5. Once you have all your keywords set up, double click your new scrapping kit from your events, press command + K to open your keyword menu, click the first photo in your scrap kit, and start tagging. For the photo below, the first 3 photos in my scrap kit are paper, and I press 1 to tag it (because 1 is the shortcut for the paper keyword), then I'll press tab to go to the next photo. I can add keywords to a normal sized scrap kit in less than a minute.
That's the basic way I organize. I've also added something called smart albums to help me find things quickly. A smart album groups all the photos together that have certain properties. I have a smart album for all my scrapbook papers, for instance, and when I click on it, it will show me all the different papers i have.


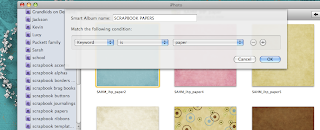
Name your smart album - I have ones for each of my scrapbooking keywords. And use the dropdown menus to define what goes in each smart album. I choose "keyword" from the first menu, "is" from the second, and then the keyword that I want included. Then click ok. For instance, in my "Scrapbooking Papers" smart album, I have all the photos whose keyword is "paper," and every time I add the keyword "paper" to a photo, it automatically updates in the smart album.