

Let me make a note, that there are a lot of ways to customize your dvd and there are different ways to do the steps that I'm about to show you, but for the sake of simplicity, I'm going to just show you one way to do it and leave out all the other options. If you play around in iDVD, you'll find lots of neat stuff, and if you ever make a mistake hit CMD-z to undo or the delete key, and you'll see a cool puff of smoke when you get rid of your mistake! Ok! So on to step...
1) Open iDVD. When you open it, your last project will automatically show up. So go to the top of your screen and choose File - New, and you will get this dialog box....
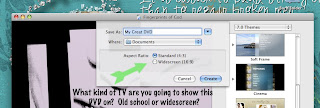
Choose a name for your project, and where you would ultimately like it to be saved (your documents folder is the default). And you need to choose what TV screen format you want it to be created for. If you are going to be viewing this on a newer computer or a flat screen TV, pick widescreen; if it's an "old school" TV (or if you're not sure) choose standard. Then click Create!
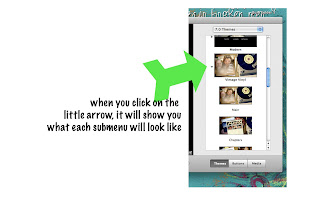
2) On the right hand side of your window, there's a column called "Themes." iDVD has pre-set themes that will give your dvd a cohesive look. There are lots of options from super cutesy, to vintage, to modern artistic, to kinda neutral.... Pick the one you like. I chose "Vintage Vinyl." You'll see things called "drop zones" - don't freak out, we'll make those look better in a minute. Unless you are building a movie with lots of little chapters, you don't really need to worry about what the submenus look like, because this DVD won't have any.
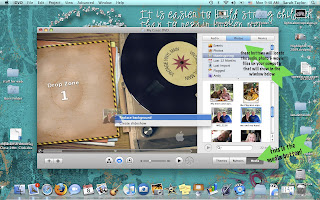
3) Now dealing with the drop zones. On my "Vintage Vinyl" theme, there's one main drop zone - a place to put a picture to personalize the look of your main menu. There are a couple ways to add a photo or movie to your drop zone, but I'll just tell you the way I normally do it. At the bottom of that right hand column, there are 3 buttons, and one says media. Click it. That column will change and will show either all the photos, all the movies, or all the music it can find on your computer. Click on the tab for photos (at the top of the column), choose a photo, and drag it over to the drop zone, and drop it. If you don't like the way it looks, press delete on your keyboard and it will disappear in a poof of smoke. Try it! It's funny! If you'd rather have moving pictures in your drop zone, you can drag a movie over to your drop zone. If you click audio, and drag your favorite song over to the drop zone, it will replace the default song on the menu.
4) Ok, now your menu is set. Let's bring in that slideshow we worked so hard on in iPhoto. Click FILE-Import-Video, and it will look like this....
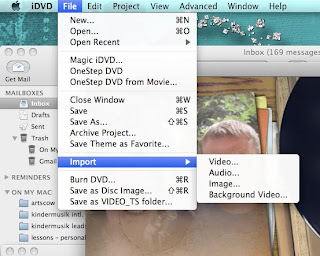
And it will bring up this dialog box.....
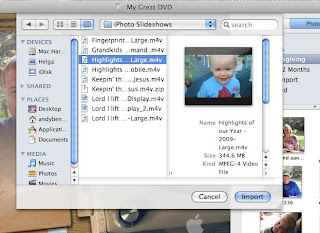
Find where you saved your slideshow, and click Import. (If you've forgotten where you saved your slideshow - type the name of the show in the little search box in the top right corner.)
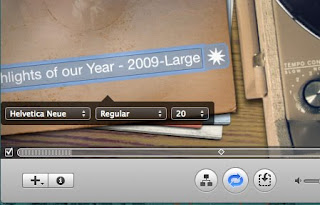
5) The name of your show will show up next to a little bullet on your main menu! You can change the text, font, size and typeface by clicking on it once, and typing or choosing the corrections.
6) If you have more than one slideshow or movie you want to put on the DVD, repeat steps 4 and 5. Depending on what you import, you may have to make a sub menu, but it's just like making your main menu. If you click the little button at the bottom center of your screen that looks like 1 box on top of 2 boxes, it will show you the "flow chart" of your DVD and whether or not you have submenus to make. There's a button toward the bottom center of the "flow chart" page that says "return," and it will get you back to your main menu.
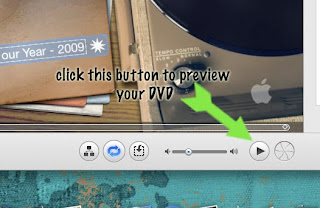
7) Preview!!! Once you think you have your DVD entirely built, preview it!! You'll see it the way anyone who receives your DVD will see it. It's another good way to check for mistakes.
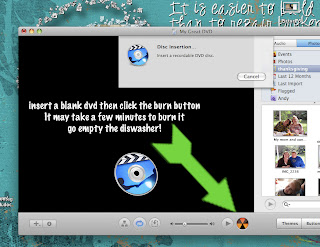
8) Once you are satisfied with every last detail, it's time to Burn Baby Burn! Click FILE-Burn DVD.
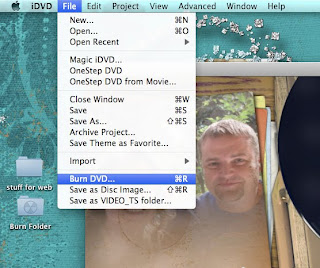
Put in a blank dvd in your dvd burner, and click the button that's black and yellow, and you're burning! Once you burn one, it will ask you if you want to burn more.
And that's it!!!! You're DVD is done! You can throw it in your dvd or give it to a friend and enjoy. Later I'll show you a nifty little envelope thingy I made out of a piece of cardstock and some scrapbook paper scraps to hold my DVDs with. You'll love it! Thanks for looking.


This information was GREAT! I am a 1st grade teacher and was trying to burn a slideshow onto a DVD that I had made in iphoto. After three attempts I had almost given up, but I googled and came across your post! My little 1st graders are going to be SO excited about their little gift! Thanks SO much!!!
ReplyDeletenot everyone has Toast which iDVD comes free with every new Mac.
ReplyDeleteFrom: burn itunes video to dvd
Thanks for your comment, Movie. This post is talking about how to burn a movie you've made and edited onto a DVD, not taking an iTunes movie or video and burning it to DVD. I haven't ever done that before. Sorry I couldn't help you.
ReplyDelete